Elpis
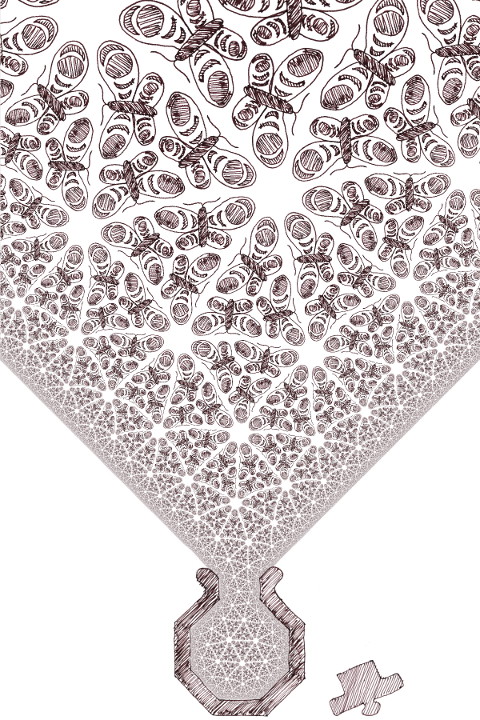
A computer-aided drawing using conformal mapping and hyperbolic tiling. The title is taken from ancient Greek mythology.
I found some old but cool software for numerical conformal mapping: Zipper. It's slightly weird to use, but it seems quite powerful. For my purposes I didn't like the way it skipped output for points that weren't inside the target region, so I patched its FORTRAN 77 code to output nonsense values instead. This makes sure that the Nth line of output corresponds to the Nth line of input.
diff -ruw conformal/zipper/inverse.f conformal-new/zipper/inverse.f
--- conformal/zipper/inverse.f  2010-10-12 16:51:27.000000000 +0100
+++ conformal-new/zipper/inverse.f      2013-08-17 02:41:54.644940816 +0100
@@ -76,11 +76,8 @@
 c a circle to the disk is not 1-1 on the outside.
 c thus we will just delete these points.
          if(x*x+y*y.gt.(1.d0+1.d-8))then
-            write(*,*)'  '
-            write(*,*)' z(j) outside region, so pullback outside disk,'
-            write(*,*)' and will be eliminated from output.'
-            write(*,*)' j=',j,'   inverse of z(j)=', z(j)
-            goto 984
+          x=-100
+          y=-100
          endif
          write(3,999)x,y
   984 continue
Zipper's demo csh script provided me with enough clues to write my own driver script in bash:
#!/bin/bash
# generate raw mipmap data for the source tex.png
for d in 1024 512 256 128 64 32 16 8 4 2 1
do
  convert tex.png -geometry "${d}x${d}" tmp.ppm
  tail -c "$(( d * d * 3))" tmp.ppm
done > texture.rgb
# generate the shape to fill with butterflies
./curve > init.dat
# massage the shape into zipper input
./zipper/polygon >/dev/null <<-"EOF"
init.dat
500
poly.dat
EOF
# compute the conformal mapping
./zipper/zipper >/dev/null
# calculate the pre-images in the unit disk for each pixel
rm "preimage.grid"
touch "preimage.grid"
for j in $(seq 1800)
do
  ./row "${j}" > "grid.dat"
  ./zipper/inverse >/dev/null <<-"EOF"
grid.dat
grid.pre
EOF
  cat "grid.pre" >> "preimage.grid"
done
# fill with a textured hyperbolic tiling
./tile < preimage.grid > tiling.ppm
# finally composite with the bottle and stopper in gimp
I wanted to generate an image with 2:3 aspect ratio, so I chose the logical coordinates of the image to be in [0,4]x[0,6]. I wanted a reasonable resolution, so the device dimensions are 1200x1800. I generate mipmaps from the base texture for anti-aliasing.
Generating the boundary curve is quite easy, as zipper/polygon reads input from a text file with one point per line, with the last point specifying which point inside the simple closed curve formed from the previous points will be mapped to the origin of the unit disk. My curve has a regular octagon at the bottom with the centre of the top edge at (2,1). The edge length is e and the centre of the octagon is at (2,h), with r being the distance from the centre to each vertex. The neck of the bottle has height e/2, and then it extends up and out at 45 degrees to far beyond the page boundaries (to avoid a visible edge within the final image).
#include <math.h>
#include <stdio.h>
const double pi = 3.141592653589793;

int main(int argc, char **argv) {
  double e = 1 / (1.5 + sqrt(2));
  double h = e * (1 + sqrt(0.5));
  double r = sqrt((e/2)*(e/2) + (h-e/2)*(h-e/2));
  double x, y;
  for (int i = 0; i < 8; ++i) {
    double t = pi / 2 + pi / 8 + i * pi / 4;
    x = 2 + r * cos(t);
    y = h + r * sin(t);
    printf("%f %f\n", x, y);
  }
  y += e/2;
  printf("%f %f\n", x, y);
  x += 20;
  y += 20;
  printf("%f %f\n", x, y);
  x -= 20 + e + 20;
  printf("%f %f\n", x, y);
  x += 20;
  y -= 20;
  printf("%f %f\n", x, y);
  printf("%f %f\n", 2.0, 1.0);
  return 0;
}
Zipper's inverse program has a hardcoded limit on the number of points it can transform, and rather than try and fix it I split my input into smaller batches - one for each row of pixels in the output image. Outputting a row's coordinates to a text file works like this:
#include <stdio.h>
#include <stdlib.h>

int main(int argc, char **argv) {
  int j = atoi(argv[1]);
  double y = j / 1800.0 * 6;
  for (int i = 1; i <= 1200; ++i) {
    double x = i / 1200.0 * 4;
    printf("%f %f\n", x, y);
  }
  return 0;
}
The last step in the driver script takes the transformed coordinates (which are now inside the unit disc, or (-100,-100) for points that were outside the region) and computes the colour for each pixel. First define some constants and global variables (not the best coding style, but it worked for this small program):
#include <math.h>
#include <stdio.h>

const double pi = 3.141592653589793;
const double c = -0.5;                   // cos(2 * pi / 3)
const double s = 0.8660254037844387;     // sin(2 * pi / 3)
const double sqrt3 = 1.7320508075688772; // sqrt(3)

static double center, radius;
static int lod = 0;
Here center and radius will be set to the circle that forms the right hand edge of an equilateral hyperbolic triangle centred at the origin in the Poincaré disk, and lod is used to pass the computed mipmap level of detail from the main loop through to the texture lookup.
The texture lookup code is probably the worst code I've written for some time. There's a huge global structure to contain the raw texture data read from disk, and copy/paste coding to grab the right mipmap level's data and send it to stdout.
static struct {
  unsigned char m10[1024][1024][3];
  unsigned char m9[512][512][3];
  unsigned char m8[256][256][3];
  unsigned char m7[128][128][3];
  unsigned char m6[64][64][3];
  unsigned char m5[32][32][3];
  unsigned char m4[16][16][3];
  unsigned char m3[8][8][3];
  unsigned char m2[4][4][3];
  unsigned char m1[2][2][3];
  unsigned char m0[1][1][3];
} texture;

void texture2D(int j, int i) {
  i >>= (10 - lod);
  j >>= (10 - lod);
  switch (lod) {
    case 10:
      putchar(texture.m10[j][i][0]);
      putchar(texture.m10[j][i][1]);
      putchar(texture.m10[j][i][2]);
      break;
    // ... and so on all the way down to ...
    case 0:
      putchar(texture.m0[j][i][0]);
      putchar(texture.m0[j][i][1]);
      putchar(texture.m0[j][i][2]);
      break;
  }
}
The hyperbolic tiling is generated by reflections in the sides of the hyperbolic triangle mentioned earlier. Hyperbolic reflection in the Poincaré disk model is circle inversion. There are three sides, so there are three transforms, and each side is rotated about the origin by 2pi/3. The circle inversion is implemented once in transform1().
void rotate(double x, double y, double *x0, double *y0) {
  *x0 = c * x + s * y;
  *y0 = -s * x + c * y;
}

void unrotate(double x, double y, double *x0, double *y0) {
  *x0 = c * x - s * y;
  *y0 = s * x + c * y;
}

void transform1(double x, double y, double *x0, double *y0) {
  double x1, y1, r1, x2, y2;
  x1 = (x - center) / radius;
  y1 = y / radius;
  r1 = x1*x1+y1*y1;
  x2 = x1 / r1;
  y2 = y1 / r1;
  *x0 = x2 * radius + center;
  *y0 = y2 * radius;
}

void transform2(double x, double y, double *x0, double *y0) {
  double x1, y1, x2, y2;
  rotate(x, y, &x1, &y1);
  transform1(x1, y1, &x2, &y2);
  unrotate(x2, y2, x0, y0);
}

void transform3(double x, double y, double *x0, double *y0) {
  double x1, y1, x2, y2;
  unrotate(x, y, &x1, &y1);
  transform1(x1, y1, &x2, &y2);
  rotate(x2, y2, x0, y0);
}
The process of generating a tiling is by reflecting the original point in all the sides. If the new points are all further away from the origin, then the original point must be in the root triangle, otherwise pick the the new point that is closest to the origin and repeat (giving up if it takes too many steps). Once within the root triangle, reflect in the x-axis if necessary so that there are an even number of reflections in total - this makes the orientation of all the triangles the same. This is particularly important as some tilings might have paths with different numbers of reflections from nearby original points in the same triangle to their final points in the root triangle, which would give an unsightly seam.
Once this terminates, if we're in the root triangle then we need to look up the pixel colour from the texture. But a hyperbolic triangle is curved, and a texture is a flat square grid. I used ternary coordinates, computing the distance from each edge in the hyperbolic triangle, and using their ratios to compute a point in a flat triangle embedded in a square. The distance() function here is actually Euclidean distance which is not quite right, but the maths for hyperbolic distance is much more involved, and I'd need to work out how to find the closest point on a given line to a given point in the Poincaré disk model.
double distance(double x, double y) {
  double dx = x - center;
  double dy = y;
  return sqrt(dx * dx + dy * dy) - radius;
}

void colour(double x, double y, double r, int depth) {
  if (0 < depth && r < 1) {
    double x1, y1, r1, x2, y2, r2, x3, y3, r3;
    transform1(x, y, &x1, &y1); r1 = x1*x1+y1*y1;
    transform2(x, y, &x2, &y2); r2 = x2*x2+y2*y2;
    transform3(x, y, &x3, &y3); r3 = x3*x3+y3*y3;
    if (r <= r1 && r <= r2 && r <= r3) {
      if (depth & 1) {
        y = -y;
      }
      rotate(x, y, &x1, &y1);
      unrotate(x, y, &x2, &y2);
      double a = distance(x, y);
      double b = distance(x1, y1);
      double c = distance(x2, y2);
      double k = a + b + c;
      a /= k;
      b /= k;
      c /= k;
      double u = b + c / 2;
      double v = sqrt3 * c / 2;
      int i = fmin(fmax(1024 * u, 0), 1023);
      int j = fmin(fmax(1024 * v, 0), 1023);
      texture2D(j, i);
    } else if (r1 <= r2 && r1 <= r3) {
      colour(x1, y1, r1, depth - 1);
    } else if (r2 <= r1 && r2 <= r3) {
      colour(x2, y2, r2, depth - 1);
    } else if (r3 <= r1 && r3 <= r2) {
      colour(x3, y3, r3, depth - 1);
    } else {
      putchar(255);
      putchar(255);
      putchar(255);
    }
  } else {
    putchar(255);
    putchar(255);
    putchar(255);
  }
}
The main program computes the generating triangle (here a {3,7} tiling) and reads the raw texture mipmap data. Then it spits out a PPM header, and computes colours for all the input coordinates. The most interesting part is the level of detail computation: h is the hyperbolic distance between two neighbouring pixels, the ratio of this to a base distance h0 determines how much the image has been stretched or shrunk - looking up into an appropriately filtered and downscaled texture for parts that are shrunk is the essence of mipmapping, providing a computationally cheap way to avoid aliasing.
int main(int argc, char **argv) {
  double dh = cos(pi / 7) / sin(pi / 3);
  double de = sqrt((dh - 1) / (dh + 1));
  radius = (1 - de * de) / (2 * de);
  center = radius + de;
  FILE *tex = fopen("texture.rgb", "rb");
  fread(&texture, sizeof(texture), 1, tex);
  fclose(tex);
  printf("P6\n1200 1800\n255\n");
  double x, y;
  double ox = 0, oy = 0;
  double h0 = acosh(dh) * sqrt3 / 256;
  while (2 == scanf("%lf %lf\n", &x, &y)) {
    double h = acosh(1 + 2 * ((x - ox) * (x - ox) + (y - oy) * (y - oy))
                       / ((1 - x * x - y * y) * (1 - ox * ox - oy * oy)));
    lod = 10 - log2(h / h0);
    lod = lod < 0 ? 0 : lod > 10 ? 10 : lod;
    colour(x, y, x*x+y*y, 32);
    ox = x;
    oy = y;
  }
  return 0;
}
There are a few enhancements left to do (mainly interpolation within and between texture mipmap levels for smoother appearance), and it might be fun in the future to make an animation of the stopper being removed, but it's good ennough for now.